
AWS IAM Roles Anywhere
Over the years I’ve managed a number of servers for work. Some of which connect to AWS resources ( S3, EC2, Glacier, etc). Often the credentials were just strings stored in environment variables or a file the ./aws folder (with restricted permissions of course). These long-term credentials work but Amazon also provides a way to get temporary credentials.
You can use AWS Identity and Access Management Roles Anywhere to obtain temporary security credentials for workloads such as servers, containers, and applications that run outside of AWS.
Your jobs can use the same IAM policies and roles as AWS applications to access resources. But you no longer need to manage long-term credentials for workloads outside of AWS.
Non-AWS Workload Access
Workloads must use x.509 certificates issued by your Certificate Authority (CA).
You establish trust between IAM Roles Anywhere and your certificate authority (CA) by creating a Trust Anchor. A trust anchor is a reference to either an AWS Private CA or an external CA certificate. There can be several trust anchors in one AWS account.
Workloads outside of AWS authenticate with your trust anchor using certificates issued by your trusted CA. This lets you get temporary credentials.
IAM roles are IAM identities that you create in your account with specific permissions. For IAM Roles Anywhere to be able to assume a role and deliver temporary AWS credentials the role must trust the IAM Roles Anywhere service principal. (aws:SourceArn must be set to the Trust Anchor’s ARN )
Profiles specify the roles IAM Roles Anywhere can access and what outside Workloads can do with the temporary credentials.
So basically we need the following things: 1. A Trusted Certificate Authority. Amazon has a way of dealing with it in the console but it isn’t free ($400 per private CA per month, 0.75 per certificate). For this article I’ll be using OpenSSL for my own CA. 2. A Trust Anchor 3. An IAM Role 4. An IAM Roles Anywhere Profile. 5. aws_signing_helper so my Python scripts can get temporary credentials.
Step 0. Preparing to Setup Roles Anywhere
Create Client Certificates
A key part of Roles Anywhere is proving your job / workload is who you say it is. This is done with signed certificates.
As a developer and Sys-Admin I’ve often needed self-signed certificates for various projects. I have some notes on creating a certificate authority and signing certificates here.
Important if you want to re-issue to the same name, update text.txt.attr to look like
unique_subject = noFirst setup a folder for client certificates
cd ..
mkdir client
cd client
Make a signing request and private key in the folder
openssl genrsa -out ggblog_key.pem 2048
openssl req -new -key ggblog_key.pem   -out ggblog_req.pem -outform PEM -subj /CN=www.greggallardo.com/O=blog/OU=ggblog -nodes   -config ../openssl.cnf
and sign it with the CA
cd ../CA
openssl ca -config ../openssl.cnf -in ../client/ggblog_req.pem -out ../client/ggblogcert.pem -notext -batch -extensions v3_client
This will create a certificate file named ggblog_clicert.pem. You will use this certificate and the private key to request temporary credentials once Roles Anywhere is setup.
If you want to set the validity period of the script instead of using the default value, use the -days flag.
cd ../CA
openssl ca -config ../openssl.cnf -in ../client/ggblog_req.pem -out ../client/ggblogcert.pem -notext -batch -extensions v3_client -days 7
Create Trust Anchor Policy
You may not need to do this step. I’ll depend on the permissions your AWS account has. When I setup a new mail server for a client, I had to go add a policy letting the my account create a trust anchor.
Log in to AWS Management Console with an account that has the right privileges.
Navigate to IAM: Go to the IAM dashboard.
Go to
policieson the left
Press
Create PolicySelect
JSONand set it to the following
{
    "Version": "2012-10-17",
    "Statement": [
        {
            "Sid": "Statement1",
            "Effect": "Allow",
            "Action": [
                "rolesanywhere:CreateTrustAnchor",
                "rolesanywhere:ListTrustAnchors",
                "rolesanywhere:GetTrustAnchor",
                "rolesanywhere:UpdateTrustAnchor",
                "rolesanywhere:DeleteTrustAnchor",
                "rolesanywhere:CreateProfile",
                "rolesanywhere:ListProfiles",
                "rolesanywhere:GetProfile",
                "rolesanywhere:UpdateProfile",
                "rolesanywhere:DeleteProfile"
            ],
            "Resource": "*"
        }
    ]
}
and press
 Next to go to the next screen.
- Set the name (in this case
GgblogAws) and pressCreate Policy
Once the policy is created or updated, make sure it shows up in your policies

You may need to wait for policy changes to propagate through the system, as there can sometimes be a short delay.
Step 1 of roles anywhere: Create a Trust Anchor
Important Make sure you’re in the right region when setting up your Roles Anyhere role. If things are missing, check your region
 2. Press
 Create a trust anchor 3. Give it a name in Trust anchor name. I went with “GGBlogAws” 4. For the source go with External certificate bundle
Paste the contents of your CA PEM file into it.  5. I skipped the optional data and went with
 Create Trust Anchor
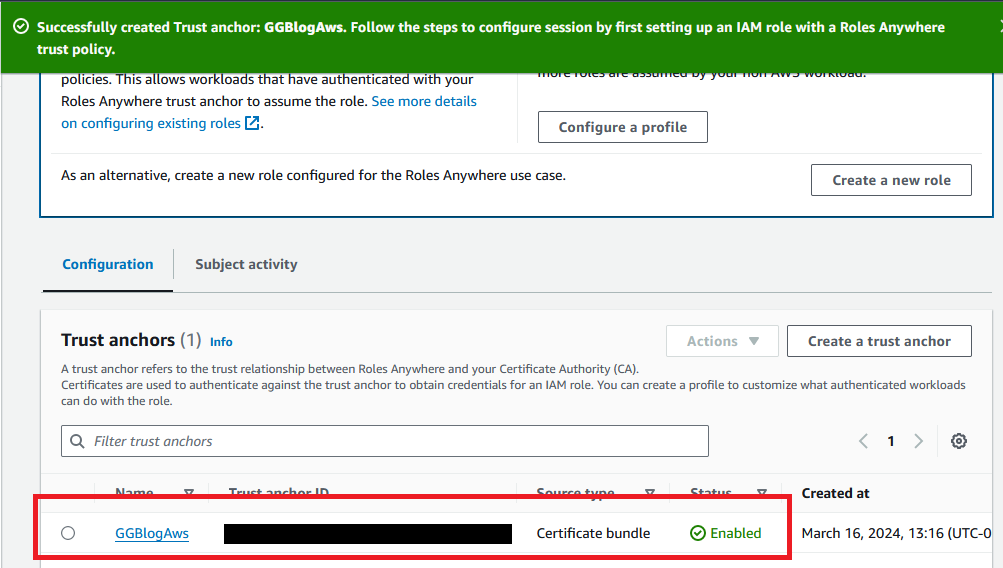
 You should now see your new trust anchor in the list
If your account doesn’t have the role to actually create trust anchor you’ll get an error like this:
User: arn:aws:iam::000000000000:user/balarm00 is not authorized to perform: rolesanywhere:CreateTrustAnchor on resource: arn:aws:rolesanywhere:us-east-1:000000000000:trust-anchor/* because no identity-based policy allows the rolesanywhere:CreateTrustAnchor actionYou or a user with permission will need to add a Policy for working with Trust Anchors to your account.
Custom policy for the role
While AWS provides a policy that gives you full permissions on glacier resources, You might want to use custom policies to restric the role to specific actions.
- Navigate to IAM Policies: In the IAM console, go to the “Policies” section.
- Create Policy:
- Click “Create policy”.
- Choose the JSON tab.
- Enter a custom policy that includes the specific permissions you need for Glacier, such as
glacier:ListVaultsandglacier:uploadArchive.
- Enter a custom policy that includes the specific permissions you need for Glacier, such as
- Edit the JSON policy:
{
    "Version": "2012-10-17",
    "Statement": [
        {
            "Effect": "Allow",
            "Action": [
                "glacier:ListVaults",
                "glacier:ListJobs",
                "glacier:UploadArchive",
                "glacier:UploadMultipartPart",
                "glacier:DescribeVault",
                "glacier:DescribeJob",
                "glacier:GetJobOutput",
                "glacier:InitiateVaultLock",
                "glacier:CompleteVaultLock",
                "glacier:AbortVaultLock",
                "glacier:InitiateJob"
            ],
            "Resource": "*"
        }
    ]
}
NOTE I have "Resource" set to *, which means the policy apply to all vaults. Which is OK for this blog post, but in the real-world you might want to restrict it to a specific value. You can use the ARN instead of "*" to restrict the resource
- Set the name. I named it
GgblogS3Glacier
After creating the custom policy, it can be attached to the Roles Anywhere role you create.
Step 2: Create Role
To create the role, I navigated back back to Roles, scrolled to the bottom of the page, and pressed Manage under Roles Anywhere  I selected
 Step 2. Configure roles and pressed Create a New Role  And went with
 Custom trust policy. Here you’ll edit the "Statement" section of the JSON 
{
    "Version": "2012-10-17",
    "Statement": [
        {
            "Effect": "Allow",
            "Principal": {"Service": ["rolesanywhere.amazonaws.com"]},
            "Action": ["sts:AssumeRole", "sts:TagSession", "sts:SetSourceIdentity"],
            "Condition": {
                "ArnEquals": {"aws:SourceArn": ["arn:aws:rolesanywhere:us-east-2:XXXXXXXXXXXX:trust-anchor/2017xxxx-xxxx-xxxx-xxxx-xxxxxxxxxxxx"]},
                "StringEquals": {"aws:PrincipalTag/x509Subject/OU": "ggblog"}
            }
        }
    ]
}- condition
ArnEqualsties this to the trust anchor. Your exact string will vary. You can get your Arn from the Trust Anchor page
- condition
StringEqualsties this to the client certificate withOU == ggblog. This was set when the certificate request was generated.
Press the next button to set the permissions. Since I want my roles anywhere jobs to access Glacier, I could add an existing policy  Or use the custom policy I setup earlier by searching for it
  To finish up press
 Next again.
Give the new role a name. I went with “GgblogGlacierBackup”  Then saved it by pressing
 Create Role.
A quick check under Roles shows it was created.  Thi should now be usable
Create a Profile
Also under Step 2 Configure roles is a Profiles section. Create a profile by pressing the Create a profile button  I set the name to ‘GgblogGlacierProfile’ and set Role to ‘GgblogGlacierBackup’
  press the
 Create a Profile button to save it.
Step 3: Use Roles Anywhere
Amazon’s docs provide link to the AWS Signing Helper executable. Most of my servers are running linux, so I downloaded the Linux helper.
wget https://rolesanywhere.amazonaws.com/releases/1.1.1/X86_64/Linux/aws_signing_helper
sha256sum  aws_signing_helper
Running help on it shows me the basic flags:
$ ./aws_signing_helper credential-process --help
To retrieve AWS credentials in the appropriate format for external
credential processes, as determined by the SDK/CLI. More information can be
found at: https://docs.aws.amazon.com/cli/latest/userguide/cli-configure-sourcing-external.html

Usage:
  aws_signing_helper credential-process [flags]

Flags:
      --cert-selector string       JSON structure to identify a certificate from a certificate store. Can be passed in either as string or a file name (prefixed by "file://")
      --certificate string         Path to certificate file
      --debug                      To print debug output
      --endpoint string            Endpoint used to call CreateSession
  -h, --help                       help for credential-process
      --intermediates string       Path to intermediate certificate bundle file
      --no-verify-ssl              To disable SSL verification
      --pkcs11-lib string          Library for smart card / cryptographic device (OpenSC or vendor specific)
      --private-key string         Path to private key file
      --profile-arn string         Profile to pull policies from
      --region string              Signing region
      --reuse-pin                  Use the CKU_USER PIN as the CKU_CONTEXT_SPECIFIC PIN for private key objects, when they are first used to sign. If the CKU_USER PIN doesn't work as the CKU_CONTEXT_SPECIFIC PIN for a given private key object, fall back to prompting the user
      --role-arn string            Target role to assume
      --session-duration int       Duration, in seconds, for the resulting session (default 3600)
      --system-store-name string   Name of the system store to search for within the CERT_SYSTEM_STORE_CURRENT_USER context. Note that this flag is only relevant for Windows certificate stores and will be ignored otherwise (default "MY")
      --trust-anchor-arn string    Trust anchor to use for authentication
      --with-proxy                 To make the CreateSession call with a proxy
Which seems like a lot, but we don’t need all of them.
./aws_signing_helper credential-process \
    --certificate
    [--endpoint]
    [--region]
    [--intermediates]
    --private-key
    --profile-arn
    --role-arn
    [--session-duration]
    --trust-anchor-arn
    [--with-proxy]
    [--no-verify-ssl]
The most important flags are the certificate flags and ARNs of the ites we just created.
./aws_signing_helper credential-process \
    --certificate
    --private-key
    --profile-arn
    --role-arn
    --trust-anchor-arn
You can get the ARNs from AWS console. The certificate and private key files were created earlier. You just need to copy them somewhere you jobs can use them.
To get the --role-arn value go to IAM > Rolws and search for your Role. Once found there’s a link for copying it  To get the profile and trust anchor ARNs, goto
 Roles > Roles Anywhere. It has a list of your trust anchors and profiles. Navigating to these lets you copy your ARNsk  Once you have your ARNs and certificates in place, you can call
 aws_signing_helper as follows.
./aws_signing_helper credential-process \
    --certificate ./ggblogcert.pem \
    --private-key ./ggblog_key.pem \
    --role-arn    arn:aws:iam::XXXXXXXXXXXX:role/GgblogGlacierBackup \
    --profile-arn arn:aws:rolesanywhere:us-east-2:XXXXXXXXXXXX:profile/XXXXXXXX-XXXX-XXXX-XXXX-XXXXXXXXXXXX \
    --trust-anchor-arn arn:aws:rolesanywhere:us-east-2:518748733169:trust-anchor/XXXXXXXX-XXXX-XXXX-XXXX-XXXXXXXXXXXXX
If all went well, you get something that looks like this:
{"Version":1, "AccessKeyId":"AXXXXXXXXXXXXXXXXXXX", "SecretAccessKey":"YYYYYYYYYYYYYYYYYYYYYYYYYYYYYYYYYYYYYYYY", "SessionToken":"ZZZZZZZZZZZZZZZZZZZZZZZZZZZZZZZZZZZZZZZZZZZZZZZZZZZZZZZZZZZZZZZZZZZZZZZZZZZZZZZZZZZZZZZZZZZZZZZZZZZZZZZZZZZZZZZZZZZZZZZZZZZZZZZZZZZZZZZZZZZZZZZZZZZZZZZZZZZZZZZZZZZZZZZZZZZZZZZZZZZZZZZZZZZZZZZZZZZZZZZZZZZZZZZZZZZZZZZZZZZZZZZZZZZZZZZZZZZZZZZZZZZZZZZZZZZZZZZZZZZZZZZZZZZZZZZZZZZZZZZZZZZZZZZZZZZZZZZZZZZZZZZZZZZZZZZZZZZZZZZZZZZZZZZZZZZZZZZZZZZZZZZZZZZZZZZZZZZZZZZZZZZZZZZZZZZZZZZZZZZZZZZZZZZZZZZZZZZZZZZZZZZZZZZZZZZZZZZZZZZZZZZZZZZZZZZZZZZZZZZZZZZZZZZZZZZZZZZZZZZZZZZZZZZZZZZZZZZZZZZZZZZZZZZZZZZZZZZZZZZZZZZZZZZZZZZZZZZZZZZZZZZZZZZZZZZZZZZZZZZZZZZZZZZZZZZZZZZZZZZZZZZZZZZZZZZZZZZZZZZZZZZZZZZZZZZZZZZZZZZZZZZZZZZZZZZZZZZZZZZZZZZZZZZZZZZZZZZZZZZZZZZZZZZZZZZZZZZZZZZZZZZZZZZZZZZZZZZZZZZZZZZZZZZZZZZZZZZZZZZZZZZZZZZZZZZZZZZZZZZZZZZZZZZZZZZZZZZZZZZZZZZZZZZZZZZZZZZZZZZZZZZZZZZZZZZZZZZZZZZZZZZZZZZZZZZZZZZZZZZZZZZZZZZZZZZZZZZZZZZZZZZZZZZZZZZZZZZZZZZZZZZZZZZZZZZZZZZZZZZZZZZZZZZZZZZZZZZZZZ==", "Expiration":"2023-11-17T03:09:23Z"}From here the temporary AccessKeyId, SecretAccessKey, and SessionToken can be used as needed with your scripts.


